Sourdough not rising in the oven. You took the bread out of the oven, but instead of a beautiful loaf, you found a flat pancake and crushed hopes. This is one of the most frustrating moments when baking sourdough bread, but there is almost always a specific and fixable reason for it. Here are the six most common mistakes and clear solutions on how to fix them.
Reason 1: The starter was not ready
This is the most common reason—even among bakers who have been baking for several months. The problem is that a starter can bubble and even rise in the jar, but still be too weak to lift the dough.
What does an active and ready starter mean?
- The most important rule: use a freshly established starter for baking only when it regularly rises and reaches its peak, rather than just after bubbles appear.
- Consistency: more important than the height of the rise (whether it rose two or three times, etc.) is the stability of the rising cycle—a strong starter should repeat the same cycle and reach its peak for at least 3 days in a row.
- Float test: It is unreliable because not every starter floats—a rye starter may not float while being healthy. Meanwhile, a wheat starter can float even though it is already over-soured.
- Reliable signs: The starter reaches its peak in 6–8 hours for at least three days in a row. As the starter rises, a dome forms at the top, and upon reaching the peak, it flattens. A rich bubble structure is visible and a pleasant, fruity acidity is felt.
Read more about how to recognize a ready starter in the previous Smart Sourdough article.
Solution: If the starter is still young and weak, keep it at room temperature (ideally 24-26 °C) and feed it at least once a day for a whole week. If you are growing a wheat starter, you can add some rye flour to strengthen it—it has more nutrients for the yeast.
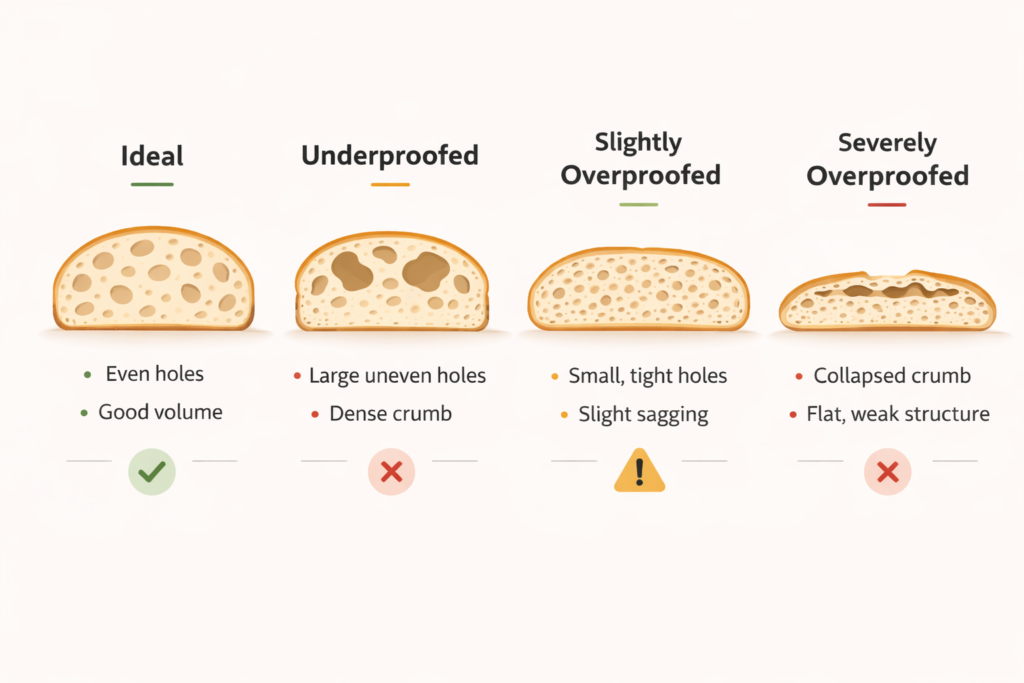
Reason 2: Underproofed or Overproofed dough
Two opposite mistakes, but in both cases, the result is similar—the bread does not rise or collapses in the oven.
Underproofed dough
If fermentation is too short, the yeast does not have time to produce enough CO2, which creates the porous bread crumb.
Signs: dense, gummy structure, pale crust, large “tunnels” at the top.
Overproofed dough
When fermentation is too long, the yeast consumes all the food, and the gluten network becomes weak and can no longer hold the gas. The dough, which looked good in the basket, collapses immediately after scoring.
Signs: dough is sticky, does not hold its shape, collapses after scoring, bread is flat, with a fine-pored crumb, separated crust on top.
Temperature impact and percentage rise control
Fermentation is a living process controlled by temperature: cold environment = slow yeast activity, warmer environment = active yeast activity.
At 21°C, primary (bulk) fermentation can last 8–10 hours, and by raising the temperature to 27°C—only 3–4 hours. Additionally, warmer dough carries momentum—fermentation will keep going even as it chills in the fridge.
That is exactly why you should not plan fermentation based on time alone. In a cooler environment, the dough can double in size; however, in a warmer environment, cut the fermentation when the dough reaches a 50 percent rise. Otherwise, by the time of baking, we will get overproofed dough and a flat loaf. Sourdough simply flattens and not rising in the oven.
Solution: Measure the temperature; observe the dough volume (percentage rise), not the clock. This is exactly where most bakers lose control: they follow recipe timelines instead of monitoring the actual dough temperature. If you bake in a different environment every time, the results will be different.
Smart Sourdough app allows you to plan fermentation based on the actual dough temperature and track the rise percentage, rather than guessing.
Reason 3: Weak gluten network
Even if the starter is strong and fermentation is accurate, without a sufficiently developed gluten network, the sourdough bread not rising well in the oven. Gluten is the protein structure of the dough that holds the gases formed during fermentation. Without it, gases simply escape and sourdough not rising in the oven.
How gluten forms and why it may not be enough
When you mix flour and water, proteins combine to form gluten chains. However, mixing alone does not strengthen them enough—you need additional mechanical work or time.
Folding techniques and kneading are not a tradition or a ritual—it is a mechanical process that aligns and strengthens gluten chains through stretching. That is why we recommend incorporating these techniques rather than skipping them.
The protein content of the flour is also important: the best flours for baking have more than 12 g of protein per 100 g of flour. All-purpose store-bought flour often have 10-11% protein. You can use it for bread baking, but the structure will be slightly weaker and the loaf flatter.
Solution: Perform 3–4 folds every 30–45 min. Before finishing fermentation, do a gluten window (windowpane) test—the dough must stretch to thinness without tearing. If it tears, continue kneading or perform a few more folding cycles. If you use universal flour, try to replace at least 30% with “strong” flour (e.g. Manitoba, which has over 12% protein).
Reason 4: Too high or too low hydration
Dough hydration—the ratio of water and flour in percent—directly determines whether the loaf rises upwards or expands to the sides.
Too much water
Too much water leads to the gluten network—even if developed—being too weak to hold the gases. The dough spreads to the sides instead of rising upwards.
High hydration dough (80%+) can give excellent results, but requires “strong” flour, strong gluten network development, precise fermentation management, and experience.
Too little water
Too low moisture slows down fermentation—microorganisms move less freely in the dough. Result: the dough rises, but slowly, and the bread crumb is usually denser.
Solution: For beginners, it is recommended to start with 65–72% hydration. When changing flour, don’t add all the recipe water at once. Reduce hydration by at least 5% and observe how the flour “takes” the water, because each flour absorbs differently. Once you can see the flour is absorbing the water well, you can gradually increase the hydration.
Reason 5: Improper shaping or scoring
Shaping is not just an aesthetic action—it is a structural process during which surface tension is created. It acts as a kind of “elastic shell” that during baking holds the shape of the dough and directs the rising of the bread upwards, and not to the sides.
Importance of surface tension
Correctly formed dough must feel taut, like a drum, but cannot be “crushed”.
- Too little tension: The dough has no support, so in the oven it simply turns mushy and spreads out.
- Too much compressed: If shaped too roughly, the gluten network is damaged and the gases accumulated during fermentation are pushed out.
Scoring
The scoring determines the direction where the bread will open during baking. Without a scoring, the bread tears at the weakest point and rises unevenly.
- Technique: Score must be about 2–2.5 cm deep. It must be performed in one quick, confident movement, so as not to distort the loaf’s shape.
- Diagnosis: If the dough collapses immediately after the scoring, it is usually not the fault of a bad score. It is an indication that the dough is fermented too long (overproofed)—the gluten network is already so weak that the score simply allows the gases to escape uncontrollably.
Solution: first perform primary shaping (preshaping), let the dough rest for 20–30 min., and only then form the final loaf. Bake the dough directly from the refrigerator. Cold dough is firmer – it’s easier to score and holds its shape better.
Reason 6: Baking temperature and steam
Oven spring is a sudden and final rise of the dough during the first 15–20 minutes of baking. This is the last stage of bread production, where biological and physical processes merge into the final result.
How does oven spring work?
- Yeast spurt: When the dough enters a hot oven, yeast suddenly accelerates gas production until a temperature of 54°C is reached and fermentation stops.
- Internal steam pressure: At the same time, the moisture in the dough turns into steam, which pushes the gluten walls from the inside and expands the loaf.
- Lid or steam at the start of baking: steam allows the crust to remain flexible for the first 15–20 minutes. Without steam, the crust hardens too early and “closes” the loaf before it has time to rise. Therefore, during the first minutes we bake with a lid or create steam in the oven.
- Temperature paradox: too high a temperature (e.g., 280°C) gives a worse result than 230°C, because the crust forms instantly. Optimal baking start range: 230–250°C.
Solution: Heat the oven and Dutch oven for at least 25-35 min. Do not open the lid for the first 15-20 min., to preserve the steam inside. Bake the dough directly from the refrigerator—cold dough provides a stronger impulse for rising.
Quick diagnostics: symptom and likelycause
| Symptom | Likely cause | First step |
| Does not rise at all, pale crust | Weak starter | Check starter activity 3 days in a row |
| Does not rise in the oven | Overproofed | Shorten bulk fermentation by 15-20% |
| Spreads to the sides, not upwards | Too high hydration or weak shaping | Reduce hydration to 65-72%, check shaping |
| Gummy, dense internal structure | Underproofed or too little steam in the oven | Lengthen fermentation, bake with a lid for 20 min. |
| Collapses immediately after cutting | Overproofed – gluten is already too weak | Shorten final proofing time |
| Different results every time | Uncontrolled temperature and fermentation | Start measuring dough temperature and control rising percentage |
If you ferment the dough at a different temperature every time and rely only on the clock, results will not be consistent. Fermentation needs to be guided by temperature and starter quantity, rather than dictated by the hours specified in the recipe. Smart Sourdough app was created precisely for this purpose.
Stop guessing. Bake with a system
With Smart Sourdough you know how much your dough has to rise, and no longer guess how long it will take.